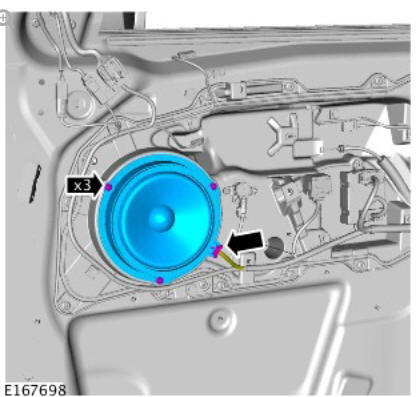
Land Rover Discovery: Front Door Speaker (G1785139) / Removal and Installation
Land Rover Discovery (2009–2016) Service Manual / Electrical / Information and Entertainment System / Front Door Speaker (G1785139) / Removal and Installation
REMOVAL
NOTES:
- Removal steps in this procedure may contain installation details.
- RH illustration shown, LH is similar.
Refer to: Front Door Trim Panel (501-05 Interior Trim and Ornamentation, Removal and Installation).

Torque: 2 Nm
INSTALLATION
- To install, reverse the removal procedure.
General Information Incontrol Touch SD Memory Card Activation
ACTIVATION
NOTE:
If required, a data storage device will require activating and then inserted into the vehicle.
- Make sure that the Jaguar Land Rover approved diagnostic equipment is connected to the network and the vehicle.
- If required, switch the ignition ON.
- Remove the correct data storage device for the vehicle from its packaging.
- Navigate to the 'InControl Touch SD Card Activation' application in Service Functions.
- Insert the data storage device into the Jaguar Land Rover approved diagnostic equipment data storage device slot.
- Follow the on-screen instructions to confirm the data storage device is in the Jaguar Land Rover approved diagnostic equipment and to proceed with the activation of the card.
- When the map activation process is complete, one of the following screens will be displayed:
- Activation successful "Map License Activated, SoftwareLevel Correct" - proceed to Step 8.
- Activation successful "Map License Activated, Unable toConfirm Software Level". Continue to follow the on-screeninstructions.
- Activation unsuccessful and error information will bedisplayed. Continue to follow the on-screen instructions.
NOTE:
Make sure that the data storage device is inserted into the vehicle's navigation data storage device slot before selecting the tick to continue with the PDI application on the Jaguar Land Rover approved diagnostic equipment.
- Remove the data storage device from the Jaguar Land Rover approved diagnostic equipment, then insert the data storage device into the navigation data storage device slot in the vehicle.
- The navigation system will automatically restart after confirming the data storage device is inserted in the vehicle correctly and the tick is selected.
NOTES:
- Make sure the vehicle has sufficient Global Positioning System (GPS) signal; it may be necessary to move the vehicle to an area of good signal coverage.
- Once the SD memory card has been activated, it will only operate in the vehicle with the matching VIN.
Once the infotainment system has restarted, enter navigation and check for operation.
READ NEXT:
 General Information Incontrol Touch Software Update
ACTIVATION
NOTES:
The following must be adhered to when updating the software level
of the InControl Touch Audio Head Unit (AHU).
When attempting to update the software level on the InControl
Tou
 Information and Entertainment System / General
information
Map Update Applicability - Digital Versatile Disc (DVD) / Universal Serial Bus (USB) Flash Drive / Secure Digital (SD) Memory Card
NOTE:
For vehicles using a Navigation Control Module (NCM), ref
 DVD Map updates
Vehicles equipped with the 'remote' Navigation Control Module (NCM) are
supplied with either a DVD or SD memory card map update which is loaded
into and left in the NCM. Map data is read directly fr
SEE MORE:
 Four-Wheel Drive
Systems - Vehicles
With- Active
Driveline Transfer
Case Draining and
Filling (G1964387)
General Procedures
DRAINING
WARNING:
Make sure to support the vehicle with axle stands.
CAUTION:
Make sure the vehicle is on a flat level surface.
Raise and support the vehicle.
Remove the engine undershield.
Refer to: Engine Undershield (501-02 Front End Body Panels,
Removal and Installation).
CAUTION:
Make sure tha
 Seat Smoothing
CHECK
WARNINGS:
Make sure that the steamer is in the OFF position before
connecting or disconnecting from the electrical outlet.
Do not use another high wattage device on the same electrical
circuit.
If the use of an extension cord is absolutely necessary, the
cord
must be rated at a minimu
© 2019-2025 Copyright www.lrdisc.com

