Land Rover Discovery: Handles, Locks, Latches and Entry Systems - Description
DOOR LATCHES
NOTE:
Driver door shown, other door latches similar
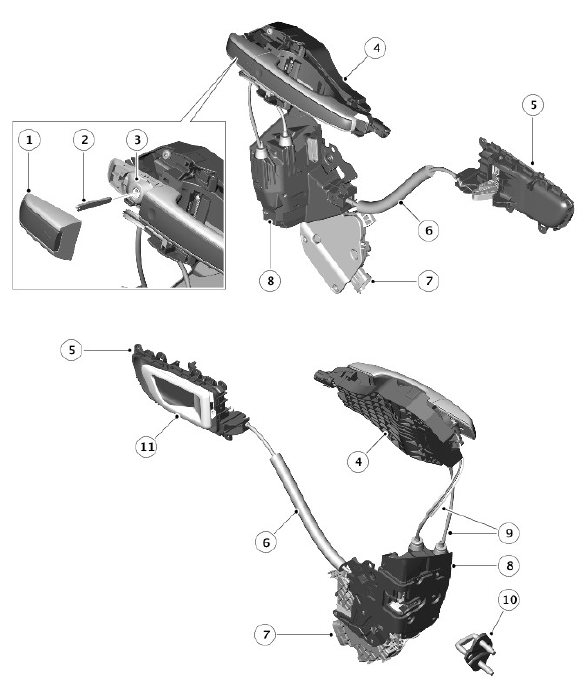
- Emergency key cover - driver door only
- Emergency key
- Emergency key barrel
- Exterior door handle assembly
- Interior door handle assembly
- Interior door latch cable
- Electrical connector
- Door latch assembly
- Exterior door latch cables
- Striker
- Interior door handle
The door latches are installed at the rear edge of each door and engage with corresponding strikers mounted to the 'B' and 'C' pillars. Each interior and exterior door handle is connected with a release cable to the corresponding door latch. In the driver door a third release cable is connected between the door latch and the concealed emergency mechanical door lock.
Each door latch is a sealed assembly comprising the following components:
- Lock motor
- Double lock motor (all except North American Specification (NAS) and Japan)
- Door ajar switch.
An electrical connector is incorporated in each door latch and provides the interface with the applicable door control module and the CJB. The front door control modules are connected to the CJB on the MS CAN bus; the rear door control modules are connected via the Local Interconnect Network (LIN) bus to the front door control modules.
The CDL lock and CDL double lock motors control the engagement of the door latches using the release cables to lock and unlock the vehicle. When the vehicle is locked, the lock motors disengage the door latches from the exterior release cables. When the vehicle is double locked, the double lock motors also disengage the door latches from the interior release cables.
When the vehicle is subsequently unlocked, the interior and exterior release cables are re-engaged with the door latches.
On vehicles with keyless entry, the exterior door handles have lock and unlock proximity sensors located within the handle.
Rear Door Child Locks
The rear door latch assemblies incorporate child locks that provide additional rear occupancy safety. The child locks are electrically operated using the inhibit switch mounted driver door switchpack. Setting the child lock to the locked position will disengage the door latch interior release cable from the door latch, and prevent opening of the rear door using the interior door handle. The rear door windows are also disabled when the child locks are activated.
Door Ajar Switch
A door ajar switch is installed in each door latch assembly and is hardwired to the CJB. If the ignition is in power modes 4 or 6 and a door is opened or is not fully closed, the corresponding door ajar switch is opened to disconnect the ground from the CJB. A message is transmitted by the CJB on the high speed Controller Area Network (CAN) powertrain systems bus to the Gateway Module (GWM), where it is passed to the Instrument Cluster (IC) on the medium speed CAN comfort systems bus, to inform the driver with a message that a particular door is ajar.
READ NEXT:
 Hood Latch
Right striker
Right hood latch
Hood safety latch
Hood safety latch guide
Left striker
Left hood latch
Hood switch
Hood release lever
The hood is secured in the closed position by two latche
Fuel Flap Latch
Fuel flap release motor
Fuel flap
Fuel flap housing
Locking pin
Connecting rod
The fuel flap latch is a motor operated latch housed within the fuel flap
assembly which locks the fuel flap in
Smart Key Battery
- Replacement
Remove cover - slide in the direction of the arrow
Use the emergency key blade to separate the two halves of the smart
key
Remove the old battery and insert a new CR2032 battery with the
posit
SEE MORE:
Front Door Speaker (G1785139) / Removal and Installation
REMOVAL
NOTES:
Removal steps in this procedure may contain installation details.
RH illustration shown, LH is similar.
Refer to: Front Door Trim Panel (501-05 Interior Trim and
Ornamentation, Removal and Installation).
Torque: 2 Nm
INSTALLATION
To install, reverse the removal procedure.
Gen
Component Location - Speakers - Incontrol Touch
Component location - Speakers - Incontrol touch- 6 SPEAKER
SYSTEM
Front right bass speaker
Front right tweeter speaker
Rear right bass speaker
Rear left bass speaker
Front left bass speaker
Front left tweeter speaker
COMPONENT LOCATION - SPEAKERS - INCONTROL TOUCH - 10
SPEAKER SYSTEM
