Land Rover Discovery: Touch screen controls
Do not adjust the Touch screen controls, or allow the system to distract the driver, while the vehicle is moving.
Always run the engine during prolonged use of the Touch screen.
Failure to do so may discharge the vehicle's battery; preventing the engine from starting.
Avoid spilling or splashing liquids onto the Touch screen.
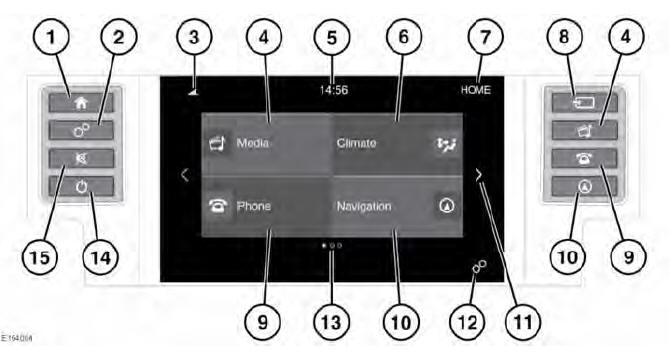
Note: The Touch screen display and the number of pages will vary, depending on the specification of the vehicle.
Note: The Touch screen will remain active until the ignition is switched off and the driver's door is opened.
- Press to select the HOME screen.
- Press to select the GENERAL SETTINGS screen
- Status icons: When a phone is
connected, the battery level and
network signal strength is displayed.
Also, when selected, TA (Traffic announcements) is displayed.
- Touch the screen or press the button, to select the Media system; or if the Media system is already switched on, touch to select the current media source menu.
Note: When the system is active, current information for the media being played is displayed.
- Clock: The clock can be adjusted via the System option, in the GENERAL SETTINGS menu.
- Touch to select the FRONT CLIMATE system.
- Screen title.
- Press to select the media SOURCE menu.
- Touch the screen or press the button, to select the PHONE screen.
- Touch the screen or press the button,
to select the NAVIGATION system.
The current destination route, or the NAV MENU screen will be displayed. For vehicles without navigation, press to display the MEDIA SETTINGS menu.
- Touch the arrow or swipe the screen,
to select the next screen to the right.
From the HOME screen, this will be the EXTRA FEATURES available on the vehicle.
- Touch to select the GENERAL SETTINGS menu screen.
- Indicator for the number of available screens. The solid dot indicates the position of the currently displayed screen.
- Press to switch the Touch screen on/off. If Surround cameras are fitted, the screen can be turned off in EXTRA FEATURES.
- Press to mute the sound. If Parking aids are fitted
TOUCH SCREEN USE
Do not use excessive pressure when selecting items on the Touch screen.
Definitions for the various button taps and Touch screen gestures used in this handbook:
- Touch: Briefly touch the screen's surface with your fingertip.
- Touch and hold: Touch the screen's surface for an extended period of time.
- Swipe: Move your fingertip over the screen's surface in a fast linear movement.
- Drag: Touch an object and move it with your fingertip over the screen's surface, without losing contact.
TOUCH SCREEN CARE
Do not use abrasive cleaners on the Touch screen. For approved cleaning products, contact a Retailer/Authorised Repairer.
READ NEXT:
 General settings
The GENERAL SETTINGS menu screen
is divided into categories. Touch to display
the list of settings for the required system:
System
Display
Media
Bluetooth
Phone
Navigation
Climate
Note: The l
Manual climate control
Note: When Eco program is selected,
heating and ventilation settings are
automatically adjusted to reduce energy
consumption.
Temperature control: Rotate to adjust.
Air distribution: Rotate to di
SEE MORE:
Uni-body, Subframe and Mounting
System Rear
Subframe - FWD (G1799046)
- Removal
PART(S)
REMOVAL
NOTES:
Some variation in the illustrations may occur, but the essential
information is always correct.
Some components shown removed for clarity.
Refer to: Electronic Parking Brake Service Mode Activation and
Deactivation (206-05 Parking Brake and Actuation, General
Procedures)
Anti-Theft - Active/ Description
Description
The door modules provide the interface between the door latch motors, the
door and latch switches and the Central Junction Box (CJB). The door
modules provide door micro switch status information and enable the door
motors on request from the CJB.
The rear door modules are controlled vi
