Land Rover Discovery: Side Panel Sheet Metal Repairs Side Panel (G1770901) - Removal
Land Rover Discovery (2009–2016) Service Manual / Body / Body Repairs and General
Information / Side Panel Sheet
Metal Repairs
Side Panel (G1770901) / Side Panel Sheet
Metal Repairs
Side Panel (G1770901)
- Removal
REMOVAL
NOTE:
The side panel is installed in conjunction with:
- Front bumper cover
- Fender
- Fender splash shield
- Front fender mounting panel
- Windshield
- Front door
- Rear door
- Rocker panel moulding
- Roof moulding
- Headliner
- Side air curtain module
- Roof panel
- Roof front panel
- Roof rear panel
- Glass roof panel
- Rear quarter window glass
- Rear bumper cover
- Rear lamp assembly
- Front seat
- Rear seat cushion
- Instrument panel
- Liftgate
- Fuel tank filler pipe
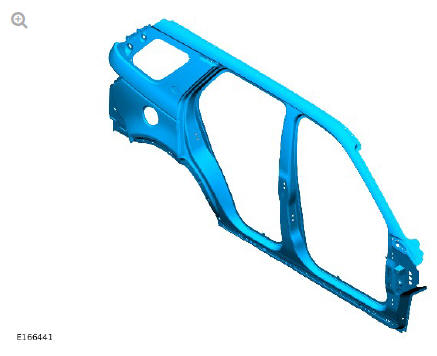
The side panel is serviced as indicated.
- Before commencing this procedure make sure that you are aware of
all Health and Safety requirements.
For additional information, refer to: Health and Safety Precautions (100-00 General Information, Description and Operation).
- For further information on the methods, tools and fixings used in this procedure refer to the body repairs - general information section.
NOTE:
Any joints sealed as part of vehicle manufacture must be sealed as part of the repair.
- For additional information, refer to: Front Bumper Cover (501-19 Bumpers, Removal and Installation).
- For additional information, refer to: Fender (501-02 Front End Body Panels, Removal and Installation).
- For additional information, refer to: Fender Splash Shield (501-02 Front End Body Panels, Removal and Installation).
- For additional information, refer to: Front Fender Mounting Panel (501-27 Front End Sheet Metal Repairs, Removal and Installation).
- For additional information, refer to: Windshield Glass (501-11 Glass, Frames and Mechanisms, Removal and Installation).
- For additional information, refer to: Front Door (501-03 Body Closures, Removal and Installation).
- For additional information, refer to: Rear Door (501-03 Body Closures, Removal and Installation).
- For additional information, refer to: Rocker Panel Moulding (501-08 Exterior Trim and Ornamentation, Removal and Installation).
- For additional information, refer to: Roof Moulding (501-08 Exterior Trim and Ornamentation, Removal and Installation).
- For additional information, refer to: Headliner (501-05 Interior Trim and Ornamentation, Removal and Installation).
- For additional information, refer to: Side Air Curtain Module (501- 20B Supplemental Restraint System, Removal and Installation).
- For additional information, refer to: Roof Panel (501-28 Roof Sheet Metal Repairs, Removal and Installation).
- For additional information, refer to: Roof Front Panel (501-28 Roof Sheet Metal Repairs, Removal and Installation).
- For additional information, refer to: Roof Rear Panel (501-28 Roof Sheet Metal Repairs, Removal and Installation).
- For additional information, refer to: Glass Roof Panel (501-11 Glass, Frames and Mechanisms, Removal and Installation).
- For additional information, refer to: Rear Quarter Window Glass (501-11 Glass, Frames and Mechanisms, Removal and Installation).
- For additional information, refer to: Rear Bumper Cover (501-19 Bumpers, Removal and Installation).
- For additional information, refer to: Outer Tail Lamp Assembly (417- 01 Exterior Lighting, Removal and Installation).
- For additional information, refer to: Front Row Seat - Vehicles With: Power Seats (501-10 Seating, Removal and Installation).
- For additional information, refer to: Rear Quarter Window Glass (501-11 Glass, Frames and Mechanisms, Removal and Installation).
- For additional information, refer to: Instrument Panel - TD4 2.2L Diesel (501-12 Instrument Panel and Console, Removal and Installation) / Instrument Panel - GTDi 2.0L Petrol (501-12 Instrument Panel and Console, Removal and Installation).
- For additional information, refer to: Liftgate (501-03 Body Closures, Removal and Installation).
NOTE:
Right hand only.
- For additional information, refer to: Fuel Tank Filler Pipe (310-01B Fuel Tank and Lines - INGENIUM I4 2.0L Diesel, Removal and Installation).
- Release and position the floor carpet to one side.
- Release and position the floor Noise, Vibration and Harshness (NVH) material to one side.
- Release and position to one side the wiring harness along the inner quarter panel and back panel.
- Release and position to one side the wiring harness on the A-pillar.
- Remove the spot welds as indicated.
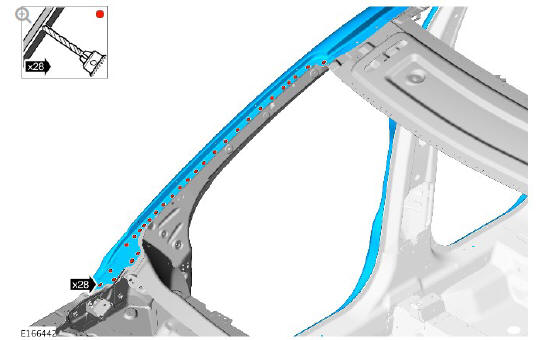
- Remove the spot welds as indicated.
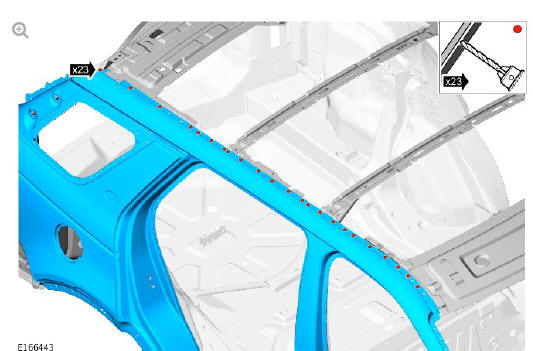
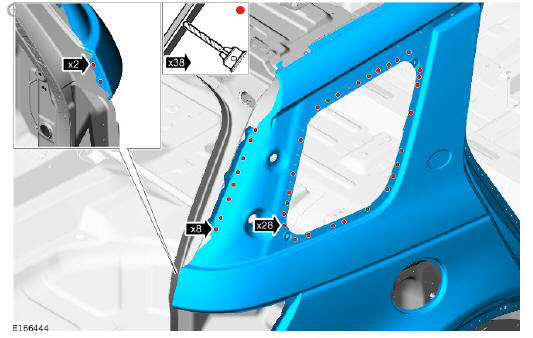
- Remove the spot welds as indicated.
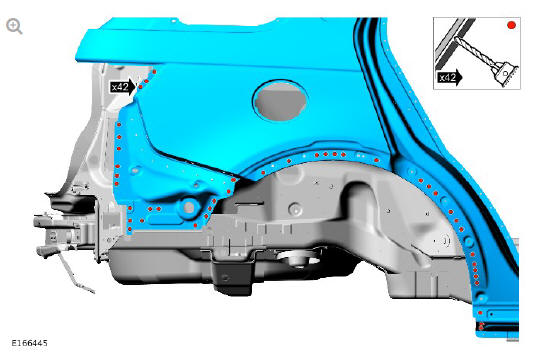
- Remove the spot welds as indicated.
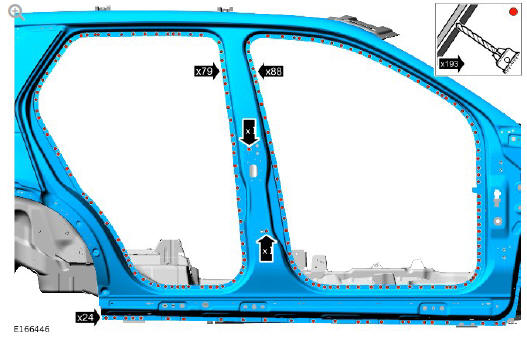
- Remove the spot welds as indicated.
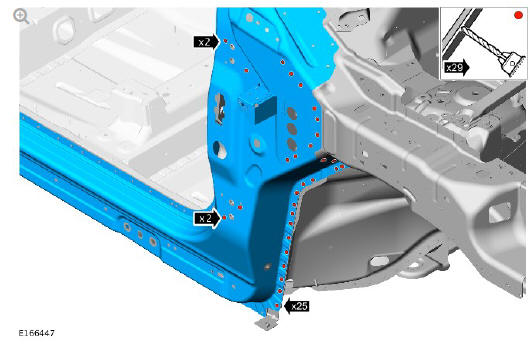
- Remove the spot welds as indicated.
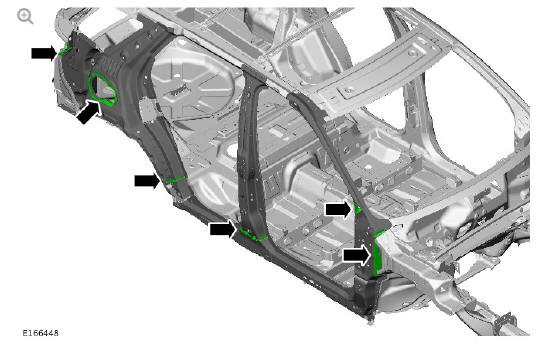
- Carefully separate the side panel joints avoiding damage to the NVH components as indicated.
CAUTION:
This step requires the aid of another technician as the side panel is heavy.
- Remove the side panel.
READ NEXT:
 Side Panel Sheet
Metal Repairs
Side Panel (G1770901)
- Installation
Side Panel Sheet
Metal Repairs
Side Panel (G1770901)
- Installation
Installation
NOTE:
Make sure that a zinc rich primer is applied to any bare metal
surfaces.
Dress the flanges where necessary
Clean and prepare the panel surfaces.
CAUTION:
This step requires the
Side Panel Sheet
Metal Repairs
Rocker Panel and 'B'
Pillar Outer
Panel (G1770927) -
Removal
NOTE:
The rocker panel and B-pillar outer is installed in conjunction with:
Front bumper cover
Front fender
Front fender splash shield
Front door
Rear door
Front seat
Rear seat cushion
Cowl s
SEE MORE:
Automatic Transmission Transaxle/
Diagnosis and Testing
PRINCIPLES OF OPERATION
For a detailed description of the Automatic Transmission, refer to the
relevant Description and Operation section in the workshop manual. REFER
to: Transmission Description (307-01 Automatic Transmission/Transaxle,
Description and Operation).
INSPECTION AND VERIFICATION
CAUTI
Pedestrian Protection System
Pedestrian Impact
Sensor (G2158916) / Removal and
Installation
REMOVAL
WARNINGS:
Do not probe supplemental restraint system (SRS) electrical
connectors.
To avoid accidental deployment and possible personal injury,
the
backup power supply must be depleted before repairing or
replacing any air bag supplemental restraint system (SRS)
components. To deplet
© 2019-2025 Copyright www.lrdisc.com
