Land Rover Discovery: Roof Sheet Metal Repairs Roof Rear Panel (G1770883) - Installation
Land Rover Discovery (2009–2016) Service Manual / Body / Body Repairs and General
Information / Roof Sheet Metal
Repairs Roof
Rear Panel (G1770883) / Roof Sheet Metal
Repairs Roof
Rear Panel (G1770883)
- Installation
Installation
NOTE:
BSF installation involves using the Land Rover approved BSF installation tool and requires a hole diameter of 6.5mm.
- Dress flanges where necessary.
- Clean and prepare the panel surfaces.
- Clean out the threads on the captive nut inserts where the new roof studs are to be installed.
NOTE:
Mark the locations of removed rivet holes in the rear joint prior to fitment to aid installation of the new roof rear panel.
.123.jpg)
- Using the old roof panel as a guide mark the position on the new roof panel where the holes for the BSF's are to be drilled as indicated.
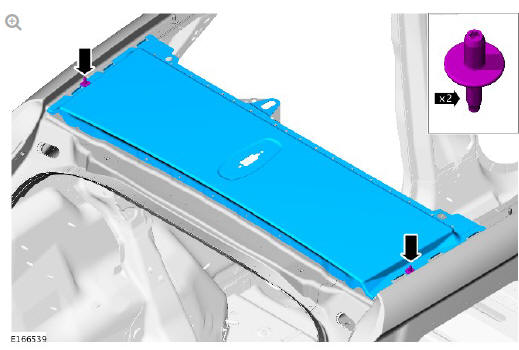
NOTE:
Do not fully tighten the roof studs at this stage.
.124.jpg)
- Offer up the new roof rear panel, loosely install the roof studs and clamp into position. Check alignment if correct, proceed to next step, if not, rectify and recheck before proceeding as indicated.
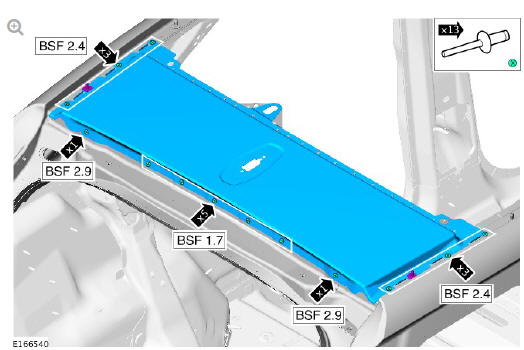
NOTE:
Make sure that the holes are drilled through the roof rear panel and the roof rear header panel.
.125.jpg)
- Drill holes where the BSF's are to be installed as indicated.
NOTES:
- Make sure that the holes are drilled from inside the vehicle.
- Make sure that the holes are drilled in the same location as the SPR's.
.126.jpg)
- Drill holes where the BSF's are to be installed as indicated.
- Remove the new roof rear panel.
- Deburr the drilled holes.
- Clean and prepare the panel surfaces.
NOTES:
- Care must be taken not to contaminate the captive nut threads where the roof studs are installed.
- Make sure a continuous bead of adhesive surrounds fixing holes.
.127.jpg)
- Apply a 5mm bead of Land Rover recommended sealer as indicated.
- Offer up the new roof rear panel and clamp into position. Check alignment if correct, proceed to next step, if not rectify and recheck before proceeding.
NOTES:
- Make sure that new roof studs are installed.
- Do not fully tighten the roof studs at this stage.
- Install the roof studs as indicated.
NOTE:
Make sure that the BSF's are installed from the outside.
- Install the BSF's as indicated.
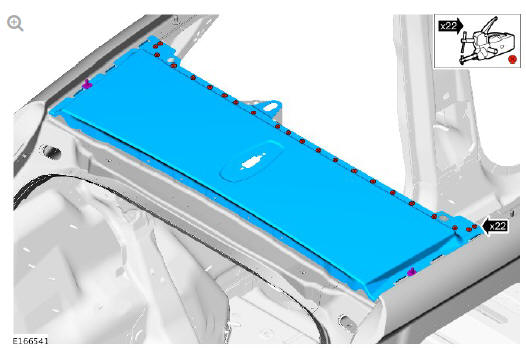
- Install the spot welds as indicated.
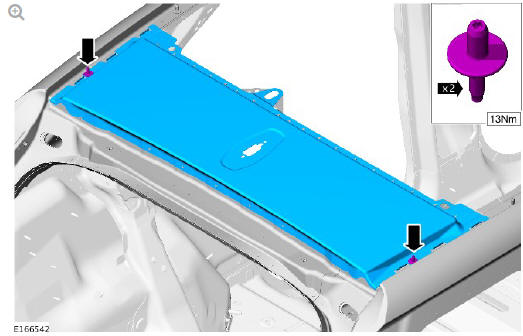
- Install the roof studs and tighten to 13Nm as indicated.
NOTE:
Make sure that all the rivet heads are sealed to prevent water ingress.
- Apply a Land Rover recommended sealer to all installed rivet heads.
- Remove any excess adhesive.
- Make sure that any open or exposed panel joints are sealed with a Land Rover recommended sealer.
- Make sure corrosion protection is applied to all areas affected by repair.
- The installation of associated panels and components is the reversal of the removal procedure.
READ NEXT:
 Roof Sheet Metal
Repairs Roof
Rear Header
Panel (G1770882) / Removal and Installation
Roof Sheet Metal
Repairs Roof
Rear Header
Panel (G1770882) / Removal and Installation
REMOVAL
NOTE:
The roof rear header panel is installed in conjunction with:
Headliner
Roof moulding
Side air curtain module
Roof panel
Roof rear panel
Glass roof panel
Liftgate
The roof re
Roof Sheet Metal
Repairs Roof
Panel (G1770876)
- Removal
NOTE:
The roof panel is installed in conjunction with:
Windshield
Headliner
Front seat
Rear seat cushion
Side air curtain module
Roof moulding
Liftgate
Antenna
The roof panel is serviced
SEE MORE:
Crankshaft Position (CKP) Sensor
The CKP sensor is located at the front left side of the engine. The sensor is
located in a hole in the lower timing chain cover and is secured with a screw.
The sensor receives a 5V reference voltage from the ECM. Two further
connections to the ECM provide ground and signal output.
The CKP senso
Tyre pressure monitoring system
(TPMS)
TPMS provides a low pressure
warning and does not re-inflate
your tyres. Tyre pressures should
be checked regularly, using an
accurate pressure gauge when the
tyres are cold.
TPMS can NOT register damage
to a tyre. Regularly check the
condition of your tyres, especially
if the vehicle is
© 2019-2026 Copyright www.lrdisc.com
