Land Rover Discovery: Fluid filler locations
Land Rover Discovery (2009–2016) Owner's Manual / Fluid level checks / Fluid filler locations
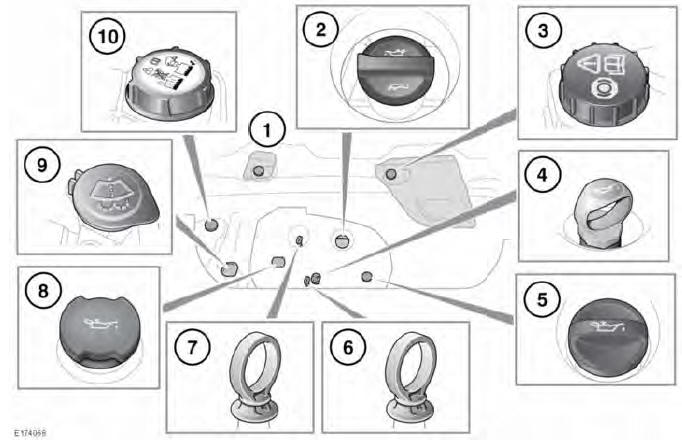
- Brake fluid reservoir cap (right-hand drive). Remove the right-side under bonnet cover for access.
- Engine oil filler cap (2.0L petrol engine).
- Brake fluid reservoir cap (left-hand drive). Remove the left-side under bonnet cover for access.
- Oil level dipstick (2.2L diesel engine).
- Engine oil filler cap (2.2L diesel engine).
- Oil level dipstick (2.0L diesel engine).
- Oil level dipstick (2.0L petrol engine).
- Engine oil filler cap (2.0L diesel engine).
- Washer fluid reservoir filler cap.
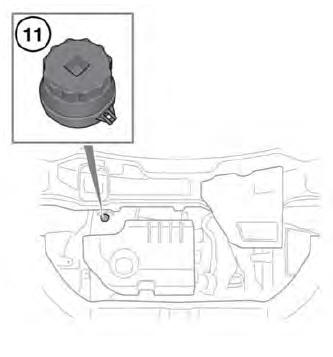
- Engine coolant reservoir filler cap.
- Diesel Exhaust Fluid (DEF) reservoir filler cap.
- While working in the engine compartment, always observe the safety precautions.
- Do not start the engine, or drive the vehicle, if there is a possibility that any leaked fluid will come into contact with a hot surface, such as the exhaust. Seek qualified assistance immediately.
READ NEXT:
 Checking the engine oil level
Check the engine oil weekly. If any
significant or sudden drop in oil
level is noted, seek qualified
assistance.
Never allow the oil level to fall
below the lower mark or notch on
the dipstick
Topping up the oil
Your vehicle's warranty may be
invalidated if damage is caused by
using oil that does not meet the
required specification.
Failure to use an oil that meets the
required specification could caus
Topping up the coolant
Never remove the coolant
reservoir filler cap when the
engine is hot. Escaping steam or
scalding water could cause serious
personal injury.
Unscrew the filler cap slowly,
allowing the pressure
SEE MORE:
Manual Transmission - Transaxle
External Controls
Gearshift Lever (G1781378)
/ Removal and Installation
REMOVAL
NOTES:
Removal steps in this procedure may contain installation details.
Some variation in the illustrations may occur, but the essential
information is always correct.
NOTE:
Neutral must be selected before the cables are released to
allow the cables to be correctly set on the install.
Manual seats / Electric seats
Manual seats
Forward and rearward adjustment.
Height adjustment.
Seatback angle adjustment.
For information on how to adjust the front
head restraint
Do not adjust the seat while the
vehicle is moving; doing so could
cause a loss of vehicle control and
personal injury.
Electric seats
Lumb
© 2019-2025 Copyright www.lrdisc.com
