Land Rover Discovery: Diagnosis and Testing Cellular Phone
PRINCIPLE OF OPERATION
For a detailed description of the Mobile phone system and operation, refer to the relevant Diagnosis and Testing section of the workshop manual.
REFER to: (415-01 Information and Entertainment System)
Audio System (Description and Operation), Antenna (Description and Operation), Video System (Description and Operation).
INSPECTION AND VERIFICATION
CAUTION:
Diagnosis by substitution from a donor vehicle is NOT acceptable.
Substitution of control modules does not guarantee confirmation of a fault and may also cause additional faults in the vehicle being checked and/or the donor vehicle.
NOTE:
Check and rectify basic faults before beginning diagnostic routines involving pinpoint tests.
- Verify the customer concern.
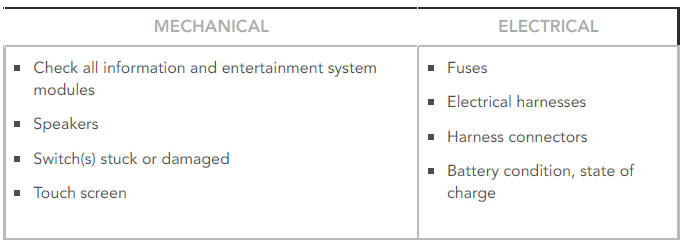
- Visually inspect for obvious signs of mechanical or electrical damage.
Visual Inspection

- If an obvious cause for an observed or reported concern is found, correct the cause (if possible) before proceeding to the next step.
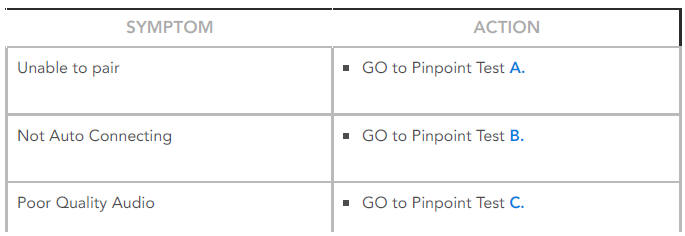
- If the cause is not visually evident, refer to the Symptom Chart below, alternatively check for Diagnostic Trouble Codes (DTCs) and refer to the DTC Index.
SYMPTOM CHART

.jpg)
DTC INDEX
For a list of Diagnostic Trouble Codes (DTCs) that could be logged on this vehicle, please refer to Section 100-00.
PINPOINT TESTS
NOTE:
Prior to continuing with any diagnosis, ensure that the Customer mobile phone and level of software is included on the JLR approved list, the mobile phone battery is fully charged and in a serviceable condition, the Bluetooth function is activated and the mobile phone is placed within the vehicle cabin area.
.jpg)
.jpg)
.jpg)
NOTE:
Prior to continuing with any diagnosis, ensure that the Customer mobile phone and level of software is included on the JLR approved list, the mobile phone battery is fully charged and in a serviceable condition, the Bluetooth and auto connect functions are activated and the mobile phone is placed within the vehicle cabin area.
.jpg)
.jpg)
NOTE:
Prior to continuing with any diagnosis, ensure that the Customer mobile phone and level of software is included on the JLR approved list, the mobile phone battery is fully charged and in a serviceable condition, the mobile phone is placed within the vehicle cabin area and is connected to the vehicle via Bluetooth.
.jpg)
.jpg)
NOTE:
Prior to continuing with any diagnosis, ensure that the Customer mobile phone and level of software is included on the JLR approved list, the mobile phone battery is fully charged and in a serviceable condition, the mobile phone is placed within the vehicle cabin area and is connected to the vehicle via Bluetooth.
.jpg)
.jpg)
NOTE:
Prior to continuing with any diagnosis, ensure that the Customer mobile phone and level of software is included on the JLR approved list, the mobile phone battery is fully charged and in a serviceable condition, the mobile phone is placed within the vehicle cabin area and is connected to the vehicle via Bluetooth.
.jpg)
NOTE:
Prior to continuing with any diagnosis, ensure that the Customer mobile phone and level of software is included on the JLR approved list, the mobile phone battery is fully charged and in a serviceable condition, the mobile phone is placed within the vehicle cabin area and is connected to the vehicle via Bluetooth.
.jpg)
.jpg)

