Land Rover Discovery: Rear direction indicator and reversing lamp bulb replacement
Land Rover Discovery (2009–2016) Owner's Manual / Maintenance / Rear direction indicator and reversing lamp bulb replacement
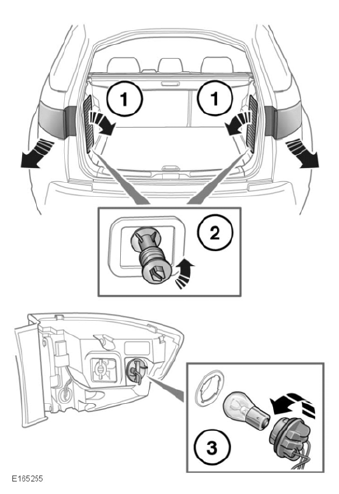
Replacing a rear direction indicator:
- Remove the appropriate loadspace vent door.
- Rotate the rear lamp's retaining screw counter-clockwise, until fully released and then remove. This allows the rear lamp unit to be withdrawn.
- At the back of the rear lamp unit, rotate the bulb holder counterclockwise and pull to access the indicator bulb.
Reverse the removal procedure to install a bulb holder/bulb unit.
Note: Note the orientation of any removed components to aid refitting.
Replacing a reversing lamp bulb:
- Remove the appropriate tailgate access door.
- Rotate the bulb holder downwards.
Pull to remove the holder from the lamp unit and access the reversing bulb.
Reverse the removal procedure to install a bulb holder/bulb unit.
Note: Note the orientation of any removed components to aid refitting.
READ NEXT:
 Wipers service position
To avoid damage to the bonnet, do
not lift the wiper blades when they
are in the normal parked position.
Note: The Smart key must remain in the
vehicle while the wiper blades are
replaced.
Before chan
The exterior
Following cleaning of the vehicle's
exterior (particularly with a
pressure washer), it is
recommended that the vehicle is
taken for a short drive to dry out
the brakes
To prevent damage to your vehi
SEE MORE:
Auxiliary Climate Control
Electric Booster
Heater
COMPONENT LOCATION
Climate control assembly
Electric booster heater
OVERVIEW
Due to the slower warm up times associated with some engines, an electric
booster heater may be fitted to increase heater performance. The electric
booster heater does this by heating the air leaving the coolant heat
Rear Door Speaker (G1785140) / Removal and Installation
REMOVAL
NOTES:
Removal steps in this procedure may contain
installation details.
LH illustration shown, RH is similar.
Refer to: Rear Door Trim Panel (501-05 Interior Trim and
Ornamentation, Removal and Installation).
Torque: 2 Nm
INSTALLATION
To install, reverse the removal procedure.
Su
© 2019-2025 Copyright www.lrdisc.com
